

Attending on line may be new to you.
Here, you will learn what you need to know to get the most out of your experience with the contest.


| Attendees | Toastmaster | Judges | Speech Contestants | Evaluation Contestants | Timers | Sergeant at Arms | Ballot Counters |
| Using Z00M -- Everyone | ZOOM duties for staff | ZOOM duties for Contestants | Breakout Rooms |
| | This page is for Web Conference Newbies Attending on line may be new to you. Here, you will learn what you need to know to get the most out of your experience with the contest. | |
--- An Invitation--- Joining --- Participating --- Chatting ---
These instructions are here to give you a head start on using Zoom in this contest.
A breakout room should be open to provide further instructions on how to communicate with Zoom, however it behooves you to do some practice before you log into Zoom on your own and practice a bit.
Invitation:
The Contest hosts have scheduled the contest and has sent an invitation vua Email with instructions on how to log in. You will be able to join the meeting via PC, Apple, notepad, or laptop for full capability. Your smart phone will also allow video and audio, but some options are limited. Your email will also show a number to call in for audio only participation by cell or black phone.
We need to put the invitation letter with The right contacts here at leas a week before the Contest.
Follow the instructions on the invitation to log in.
30 minutes before Contest, in the main room, please welcome people. Explain where other participants are currently -- Staff with Chief Judge and Contestants with Contest Chair. Ask them all to mute their microphones. You will need to explain how.
Defeating the complexity; Will collaborating on-line be simple? No. Not quite, but no new endeavor is simple. Once up and running, distance, weather, dark winding icy roads will no longer be a barrier to sharing out knowledge with the group.
It would be impossible to write a complete user’s manual for our on-line meetings. Like all modern apps, Zoom, like other virtual meeting programs, is like discovery games with lots of personalizing options. You are expected to explore and discover what you want to do. Fortunately, the complexity can be minimized by starting out with the default configuration. You can experiment with options as you gain experience. While online, ask the others how to change things more to your liking. If something goes wrong, don’t worry about it, a laugh helps. After a while you will get more comfortable. Some will just keep the default options. Others may change everything. It’s up to you.
Aside from the complexities of tele-meetings, we need understand how the meeting will flow. Check out the meeting schedule on the home page.
Once we are communicating we enjoy the Contests much as we would if we were all in the same place..
The first part of the meeting will include a check-in process in which the Contest staff makes sure everything is set up properly, and everyone can communicate. Inevitably, there will be problems. Feel free to ask questions about how to do what needs to be done. If you can’t be heard, ask your questions in a chat to everyone.
Prepare before logging in: Using a computer or notepad, you will be offered two choices: to download the app or to run using your browser. To minimize conflicts with browsers that don’t play well with Zoom, We recommend that you take the time to review Zoom’s website at Zoom.com and register. It is free and not too difficult. Explore the website to learn everything you can, well before the scheduled meeting. If you choose not to register, you should join one of the sample meetings offered on the site and make sure your browser is compatible. Firefox, for instance has some problems.As you explore the web site, make sure you have an operational microphone, speakers or headphones and a camera for the video and images. Log in early so you can test your mike, speaker, and camera. My preference is a USB headphone with microphone. (I got mine from Goodwill for eight dollars) Generally
your computer will automatically connect to the headphone with minimal confusion. Separate mike, speakers, and camera take a bit more work to get working.
Using an Ipad or notepad, most people use the device’s mike, speaker and camera, or use a headphone that comes with the device. Get friendly with Zoom: From your browser, open https://zoom.com. The Zoom main page allows you to explore zoom’s capabilities. You will have the option of running Zoom from its own app, or run from your own browser. We recommend that you register with Zoom from its home page so you can access the app directly.
Registration is free and, if you follow the directions, you should have no problems.
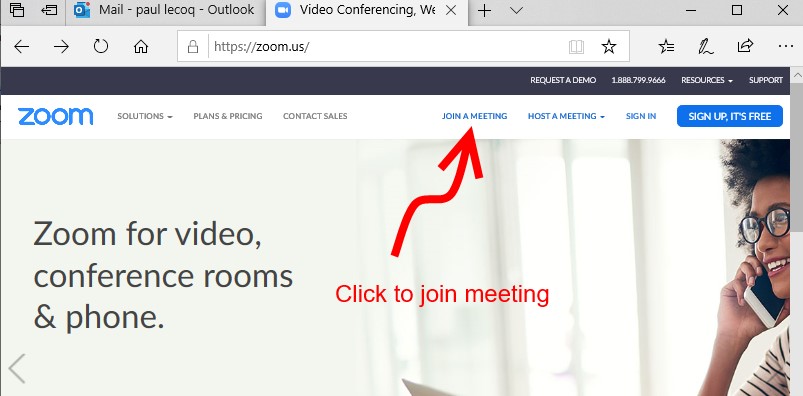
Joining a meeting using the Zoom app.
Go to Zoom.com with your browser. If you have explored the site and registered you will be familiar with the process
 .
.
To join the meeting click the <Join A Meeting> button as shown. If you have not previously downloaded the app, it will ask you to download it. Do so now if necessary. If you choose not to download, click on the option that allows Zoom to be run via your browser.
Emailed Invitation from the Contest staff
The Invitation To Zoom Meeting Email you receive will give the time and date for the meeting. We will open the meeting before the published start time to give you time to get logged in and check out the connection.
Invitation Email: Your invitation will look something like this:
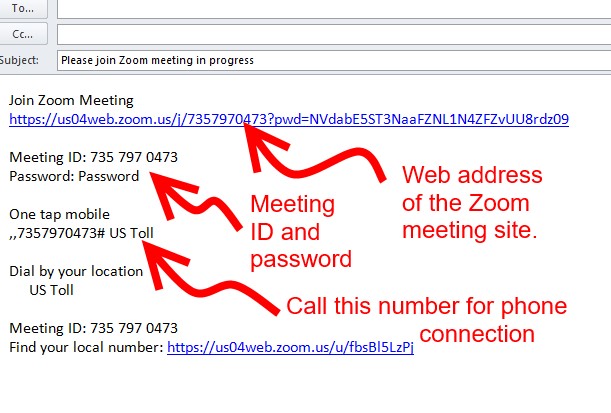
The invitation is for attendees. If you want to invitite others, forward these instructions and the invitation Email to them.
A password is not required. You may forward the invitation and this website to anyone who you invite.
If you go to the “Join Zoom Meeting address with your browser, it will take you directly to the meeting join page. Follow the directions from there. It is a bit less confusing to first go to Zoom.com and click on the <Join A Meeting> button and skip the web address of the Zoom meeting site.
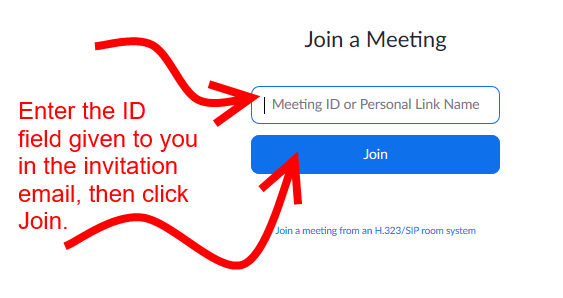
Enter the meeting ID as shown. It’s best to copy it from your email and paste it into the box to avoid mistyping the messy ID.
Clicking the <Join> button should get you into the meeting.
This should get you into the Zoom window for our meeting. If this does not happen, repeat the process or check out error messages. (They may not be much help) If all else fails, call the meeting host.
When you have successfully joined the meeting you will see a screen something like this. One can hope the host will be more presentable than shown here, but please don’t expect too much from a nerd.
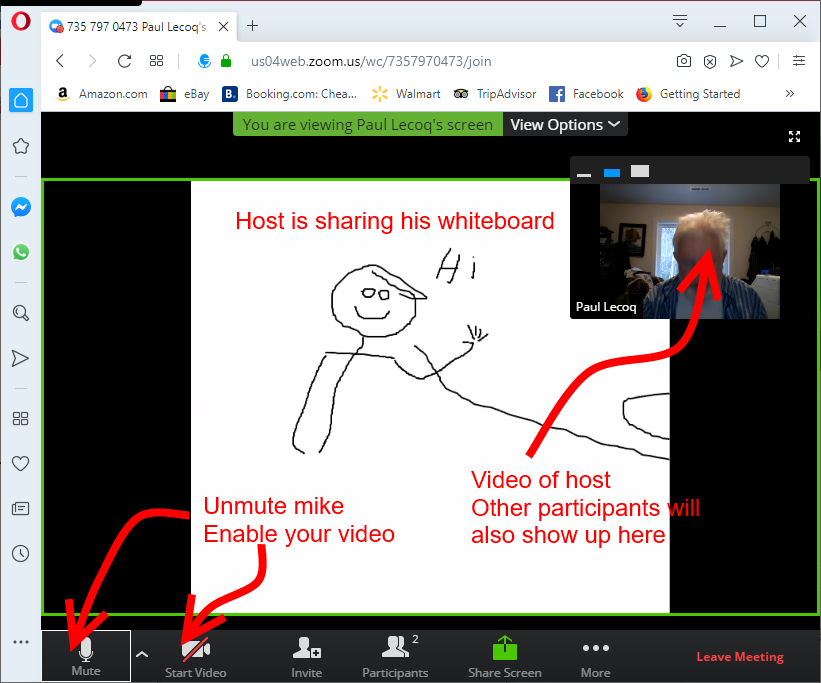
You will see either the host’s picture or something from the host’s screen he or she is sharing. In this example the host is waving to you by sharing the white board.
Participants pictures typically show along
the right side but once you get comfortable with the app you can arrange your screen to your own design.
One of the first things you will do is to enable your microphone and video. A red bar-sinister across either indicates that it is not enabled. Click the mike to unmute. Click the camera to enable your camera to show your image.
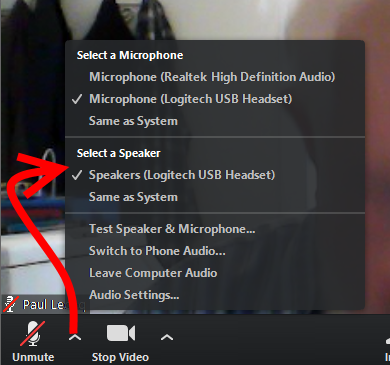
The “^” lets you choose and set up your microphone. Just follow the directions. As the image shows, you can select your microphone, select your speaker. We recommend that you ckick on <Test Speaker & Microphone> to make sure they are both working.
Check the speaker and microphone as soon as you join the meeting or you may not be able to communicate.
Feel free to try the other choices on this menu to find out what they do.
You probably won’t need to use <Invite>. Participants shows who is on line. *** gives you chat and video options. Experiment with these controls until your are comfortable with them.
The <Share> options allows you to choose what you want to share. For example, you might want to show an image of your cat, or your book cover. Sharing works one-at-a-time. Only one participant can share at a time. The host controls who has this option.
The host will mute & unmute as needed for verbal communications. Unless the exchange gets too complex, the default is everyone unmuted. It is polite for you to mute yourself unless speaking since any noise might interrupt the person speaking. The host may select one attendee to be the prime speaker with their picture or shared item shown to everyone.

By clicking on the <chat> button you will enable the chat window at the right of the screen. Typing a message in the <Type message here. . .>, and pressing the <Enter> button sends the message to the addressee(s).
Clicking on the <To>field that shows “Everyone” in this example, allows you to send your chat to all attendees or direct it to only one. Some people may regard back-channel one to one only to be rude, but it is often better not to clutter the chats with unnecessary messages that only apply to one pair of attendees. Often a message is a question just for the host, such as I would like to speak, if the host has you muted.
How we will share our work for the peer review: We will begin with a sample of your writing no longer than four to five pages double-spaced. For the first meetings, we should reply to the invitation letter with your sample attached to the email. We will be reviewing it on line at the the meeting.
The host will combine all the samples into one document which will include all samples. The host will send this composite document to all attendees.
When you get that file, add your name to the end of the file name (file name <samplessFor-5-27> will become <samplessFor-5-27-PaulL>. Putting your name in the file name lets the author know from whom the comments are coming. Besides, if they all come back with the same file name, the first files will be overwritten by the later files. We need to keep things straight. Submit your work a day or two early to make sure your work is included. During the meeting, you can open that document to follow along with the author as she reads. The document will have <Track Changes> enabled so any notes, suggestions, or corrections will be flagged so the author has your critique. After the meeting, you can return your modified copy of the document (with your name as part of the filename so it won’t be overwriten) to the host, who will send the changes back to the author.
If you have not submitted your pages in time to be included, you could attach it to a chat message if there is enough time during the meeting. However, I’ve had some trouble getting this to work consistently during a meeting. We can experiment.
This process is a bit arduous for the host, but it’s a fairly reliable process to begin with. Once we get used to meeting on line, we can come up with more efficient methods. One idea is to use dropbox or some other common source through which we can use Word’s collaboration options directly. That way, we could avoid the back and forth attachments. Your inputs will help us develop the most effective process.
Remember, this is a new thing, an experiment. Don’t expect it to go smoothly unless you are some kiknd of an old pro. . . Even then, it may not go smoothly.
Contest Begins
Presiding Officer
I am calling the meeting to order. Welcome Toastmasters and guests.
I ask everyone to silence their cell phones.
Evaluation
contestants , IF you do NOT need your cell phones to communicate in
this meeting, please put your cell phones and other electronic devices
outside of the room that you are in with your computer.
Everyone
mute their microphones while we are going over logistics. On all
computers the following will work - You can find the mute by looking at
the bottom left hand corner. Icon is a microphone. It is a toggle
switch. Tap once to mute. Tap again to unmute. When the microphone is
muted, it will have a red line across it.
For some folks, the space bar works to mute and unmute. Just like a toggle switch.
Once
the contest begins, we ask that everyone unmute your mics. WE want the
contestant and judges to interact and hear the audience reaction.
At this time I would like to continue to give some Zoom basics for those who are not contestants for contest staff.
Pin and unpin. In the upper right hand corner, find three dots. Click on the dots. Then select pin. Do the same thing to unpin .
Chat
to everyone. Zoom defaults to chat with everyone. To chat, send a
written message which will be saved and archived, at the bottom of the
zoom window, click on the callout icon. Chat will appear. Type in the
box at the bottom of the chat window.
Chat to one person, click on the arrow next to “everyone” and select the participant you wish to send a chat message.
Mute
and unmute. Once again, at the bottom left hand corner or use the space
bar. A red line across it means your microphone is muted.Thank you.
Zoom
automatically sets video to mirror image. If you want to fix it,
then go to the icon at the bottom left hand corner that looks like a
video camera. Click on the arrow. Go to settings. Unselect mirror image.
Normally in a Toastmaster meeting we would do a round of introductions. Because this is a contest, No Introductions around the room.
[Explanation of Contest and the purpose of a contest.]
Let us begin. Please help me welcome International Speech Contest Chair, Linda